Year: 2017
Client: Coop
VFX Studio: Fable FX
I was responsible for grooming and creating the look development of the donkey for the Christmas advert of Coop.
Year: 2017
Client: Coop
VFX Studio: Fable FX
I was responsible for grooming and creating the look development of the donkey for the Christmas advert of Coop.
Year: 2017
Client: Coop
VFX Studio: Fable FX
I was responsible for grooming and creating the look development of the donkey for the Christmas advert of Coop.
Gabriela Salmeron
YETI TUTORIALS
Feathers
Yeti has an internal procedural feather formed by strands. Several attributes can be edited and their format can be customized. It is faster to render and produces better results than using planes with alpha textures. We use the Import node to import and connect it to the second input of an Instance node. The simplest and most common way to distribute them is by using a normal graph with Scatter and Grow nodes, then connecting it to the Instance node in the same way we do to instantiate objects. However, we can have better control over its distribution by using the Convert node with Guide Sets or Grooms.
Instancing Feathers with Guide Sets
In this example, a Guide Set is imported into the graph and converted to fibers using the Convert node in Strands to Fibers mode. Then, each feather is instantiated on top of each guide.

Example File: Feathers_GuideCurves.ma
Download at https://www.dropbox.com/s/usqw6senr4igymd/Feathers_GuideCurves.ma?dl=0
Instancing Feathers with Grooms
Following this same idea, it is also possible to use a Groom instead of the Guide Set, so a feather is instantiated on top of each Groom strand.
Example File: Feathers_Groom.ma
Download at https://www.dropbox.com/s/41rxc9yeljktl8j/Feathers_Groom.ma?dl=0
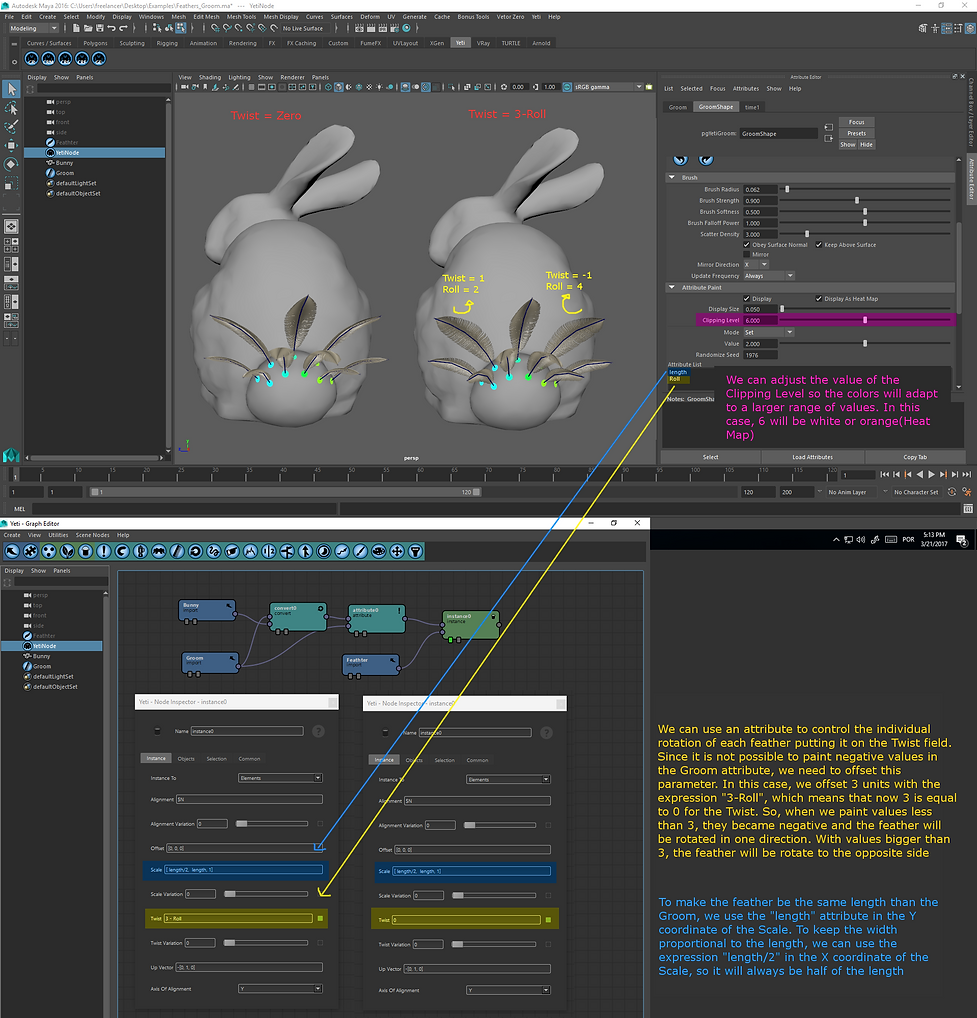
For each feather to have the same length as each strand has, you must use its length attribute in the Scale field of node Instance. This field receives a vector in the format [x, y, z] corresponding to the scale in width, length and thickness that the instance will have. We can use the length attribute for the length in y, and write its width in x either directly, by placing an explicit value or another Groom attribute, or by using mathematical expressions as length / 2 (the width will always be half the length).
In order for the feathers to follow the strand format, the Deform option must be enabled in the Instance node Objects tab.

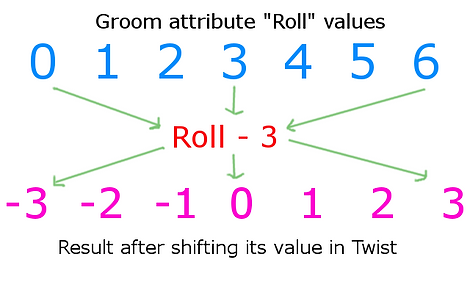
We can create attributes in the Groom and paint a different value for each feather. In the previous example, we created an attribute called Roll to be used as the rotation of the feather in the Twist field. Because it is not possible to have attributes with negative values inside the Groom, we can shift their values and convert them to positive and negative values within the graph. It is similar to using the fit () function.
Painting attributes directly on the Groom that will be converted is interesting for cases where few feathers will be used, such as Hero Feathers. However, with a greater amount of feathers it can be tough to paint the attributes on so many guides. To solve this, we can use an additional Groom with fewer guides just to define the hairstyle and attributes. We can even split a Groom only for hairstyles and another for Attributes, depending on the complexity of the system.
Note that this Convert system is heavier to process than instantiating using the Scatter and Grow nodes. But it allows for more precise control over the position of each feather, which may be necessary in some cases.

Example File: Feathers_Groom_Placement.ma
Download at https://www.dropbox.com/s/vrzk43vkogksci0/Feathers_Groom_Placement.ma?dl=0
Texturing Feathers
We can map textures or Ramps to the feather through their own coordinates U and V, which are already created automatically by the Yeti. There are two ways to do this: With a node of VRayUserScalar (VRay) or aiUserDataFloat (Arnold) using feather_u and feather_v attributes; Or with a place2dTexture node, changing the UV set name to feather_uvw in 2D Placement Options. To enable these options in VRay, go to the Attributes -> VRay -> 2D Placement Options tab.
To vary the textures or colors, we can use a conditional node as a mask, through the feather id or any other attribute passed to the render by the graph.

Example File: Feather_Shading.ma
Download at https://www.dropbox.com/s/rnlj4k4n5fj178f/Feather_Shading.ma?dl=0
Feather Shapes and Attributes
We can edit the parameters that Yeti’s internal feather has inside our graph. Any changes made to the graph overwrite the old values. In the Attribute node, we put the attribute corresponding to the global variable of each feather parameter. To see the list of variables available, right-click on the node and go to the Attributes tab.
Remember to use Detail Type as Constant.

Example File: Feathers_Attributes.ma
Download at https://www.dropbox.com/s/gkt8umwfqniy7tv/Feathers_Attributes.ma?dl=0
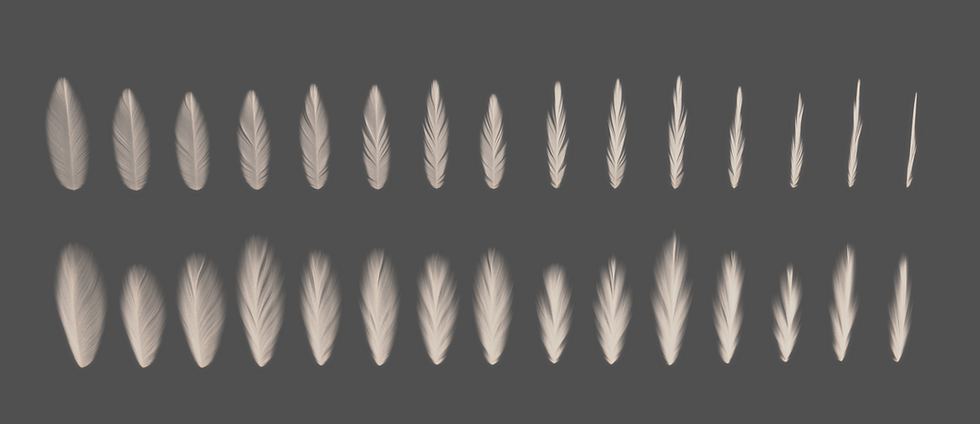
Using Groom attributes, we can create interpolations between these parameters. We can make a region start with the well-defined feather shape and gain deformations along the body of a character. Remember to inherit each of these Groom attributes or other global variables as needed. An interesting function to enhance interpolations is fit (). It converts one range of values into another, keeping the same ratio.

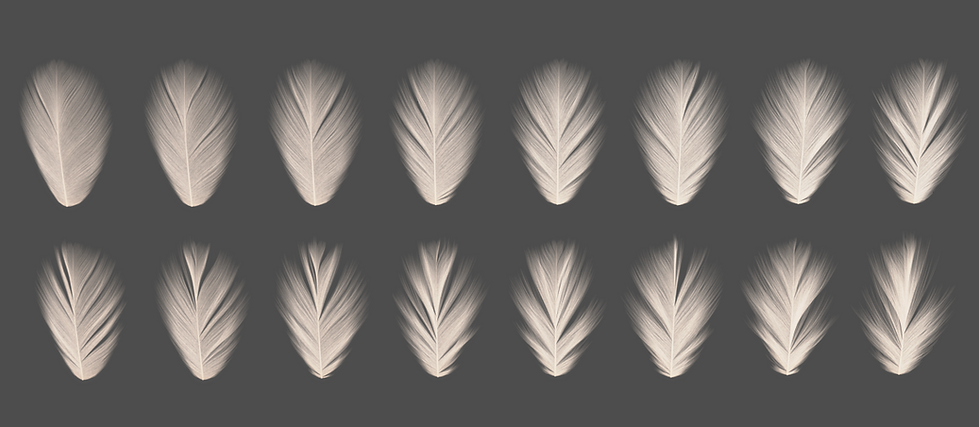
Although the internal feather of the Yeti being very flexible and customizable, in the version that this manual has written it still presents some limitations that make difficult to get specific shapes.
One is in relation to the curvature of the feather, which may not be very intuitive to control. We can use combinations between curvatures and Normal attributes with both positive and negative values to obtain different formats. You can also edit control points (edit mode - F8) to raise the barbs or force the shape.


Example File: Feathers_Shapes.ma
Download at https://www.dropbox.com/s/5shebhx20as7azq/Feathers_Shapes.ma?dl=0

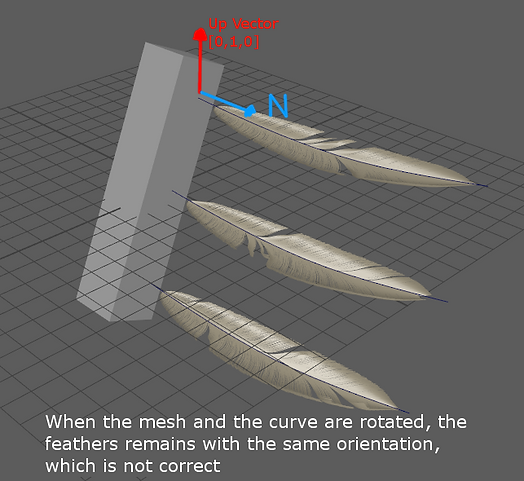
Up Vectors
Another important field of Instance node when it comes to feathers and wings is the Up Vector. It is responsible for ensuring that the orientation of the feathers will always be correct regardless of the rotation that the mesh or the curves have when animated. By definition, the Up Vector field is filled with the value [0,1,0], that is, pointing in the positive direction of Y. The Alignment field comes with the global variable N (Normal) filled in.

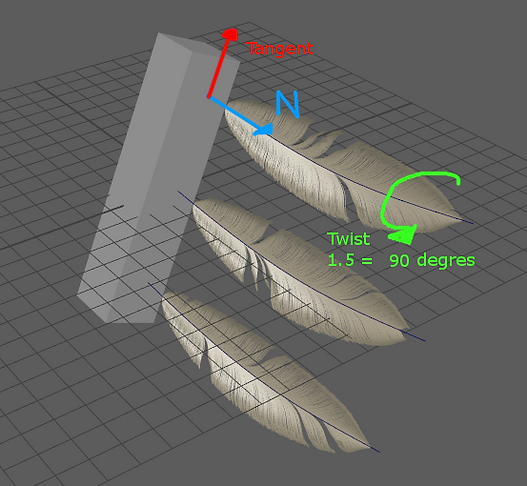
An alternative to correct this problem is to use the vector N itself as Up Vector or the tangent vector. The tangent vector is created in the Attribute node, in the Geometric-> Add Tangent tab. The twist field can be used to rotate the feather in relation to its vectors and make the final adjustment.
In the case of a wing that will suffer extreme deformations on its mesh during the animation, especially when the wing is closed, vectors relative to the mesh faces as N and tangent will not be enough to guarantee that the orientation remains correct. For this, we can use vectors created externally as Up Vector, being passed through Custom Global Variables or curve parameters.
In this example, the X, Y, Z translation values of a locator are used to assemble a global custom vector that will be used as Up Vector. This locator can be connected to the Rig and animated, directly controlling the orientation of a group of feathers. It is a simple solution that can be applied in different situations. However, it can cause problems in more complex systems, since the same value of Up Vector is passed for all the feathers of a Guide Set, which can cause some feathers of the group to orient themselves in the wrong way.

Example File: Feathers_CustomUpVector.ma
Download at https://www.dropbox.com/s/7b3era33hhbiamc/Feathers_CustomUpVector.ma?dl=0
Another way to pass the external vector to the Up Vector is through the individual parameters of each guide. When a group of guides is added to a Set and this Set is added to the Input Guide Set of the top node of the Yeti, each curve automatically creates additional parameters called Extra Attributes.
These parameters can be used similarly to density maps, clumping, etc.
Each of these parameters receives a Float value, which can be either positive or negative. Expressions can be added to each field to link curve parameters with parameters from the Rig or any other object. In the case of pen alignments, we can use parameters that are not relevant to the case, such as clumping (BaseAttraction, TipAttraction and AttractionBias), as a bridge to send an X,Y,Z vector to the corresponding Up Vector of each feather.

In this way, each curve will have its respective orientation vector, and consequently, each feather will also receive its own Up Vector.
These orientation vectors must be generated from the Rig and linked with the animation, each being passed via an expression for the parameters of each curve. It is also important to ensure that the Proxies of the feathers use this same vector to orientate themselves, in order to guarantee the same final behavior.
To receive these orientation vectors inside the Yeti tree, in the Up Vector field of the Instance node, three parameters must be passed corresponding to [x,y,z].
In this example, it would be: Up Vector = [baseAttraction, tipAttraction, attractionBias]
The Twist parameter can be used as a rotation aid for fine adjustments, being passed in the Twist field of the node Instance. Positive values rotate to one direction and negative values to rotate in the opposite direction.

Custom Feathers
There may be cases where the Yeti procedural feather will not be flexible enough to create a specific feather design, like a peacock feather or prominent character head or tail feathers for example. In this case, we can create a new procedural pen from scratch with a great deal of customization.
We must take into account that this method is more costly in terms of processing and memory than the Yeti's internal feather, so it should only be used when really necessary or in small amounts.
We started by creating a geometry hachi. We created a Groom over it that will dictate the shape of the bristles and will have the attributes to manipulate the feather's deformers.
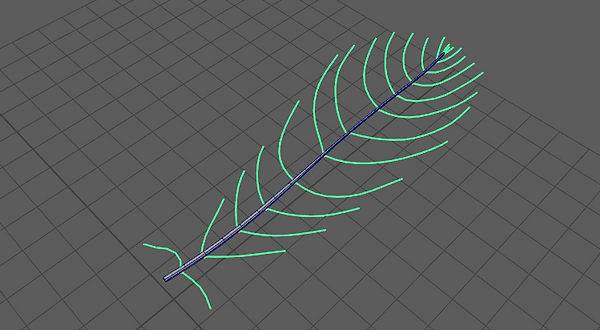

We can use nodes like Comb, Clumping and Bend to get the desired shape of the barbs, similar to a normal hairstyle.
The Transform node can be used to flatten the barbs vertically, and then with the Bend node we create a curvature. It is also possible to split the feather into sections, to create a specific shred in some areas, combining everything in the end with a Merge or Blend node.

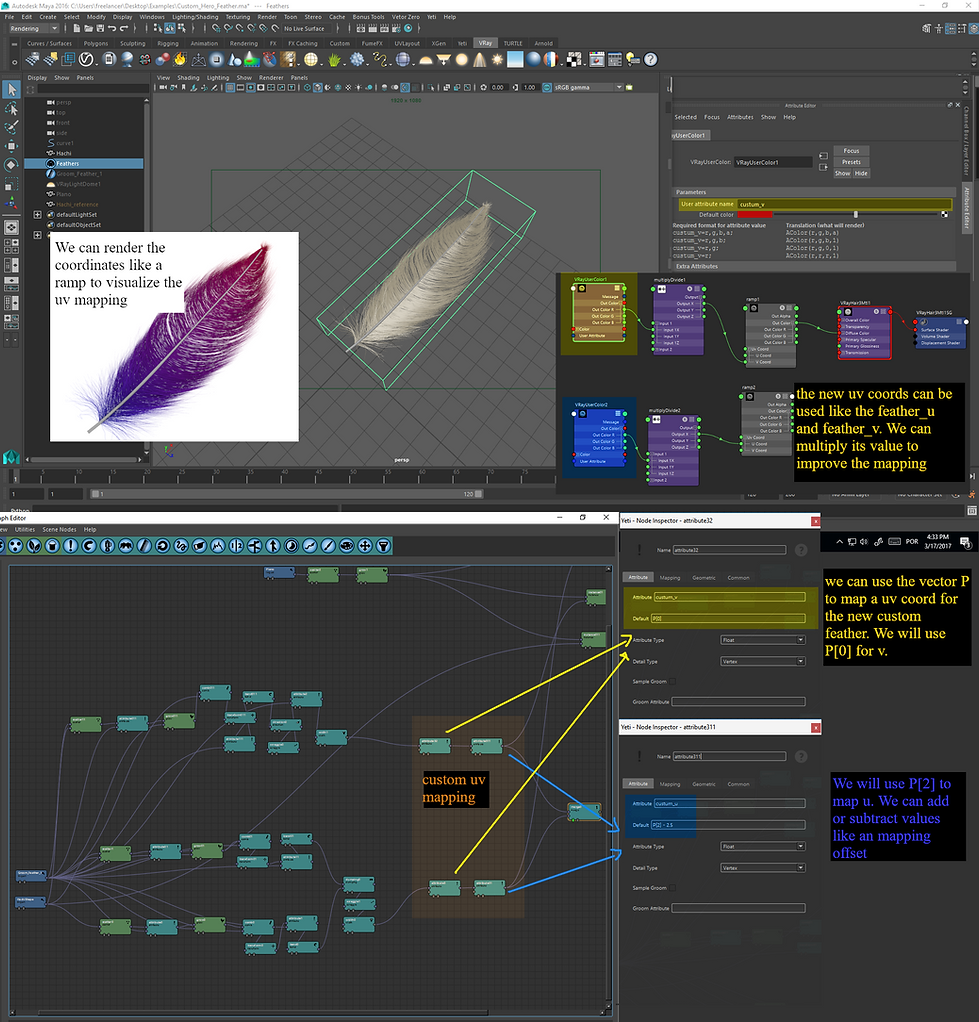
To texture this newly created feather, we need to map its space to new u and v coordinates.
For that, we use the Attribute node to create two new renderable variables and assign the values of P[0] and P[2], which are the space values in X and Z respectively.
As these values depend on the global position and scale of the object itself in the scene, it may be necessary to calibrate this mapping. We can add or subtract values to offset the mapping, and we can multiply by values less than or greater than 1 to change their frequency.
We use the new u and v coordinates created in a node of VRayUserColor or aiUserDataColor in the same way as we use in Yeti's inner feather with feather_u and feather_v.
Finally, we can instantiate the custom feather on an object in the same way we do with the Yeti's internal feather.
You need an Instance node for each part of the feather, including the hachi.
We can make variations of this feather and use the cycle command to create combinations.
It is important to remember that the variables used to create the new u and v coordinates must be inherited by each Instance node.
Even with the feather suffering movement or deformation in space, its new coordinates continue to function, as they were created in the pen before these deformations. We can create an attribute to separate the hachi and use it as a mask for the shader.
Finally, we can instantiate the custom feather on an object in the same way we do with the Yeti's internal feather. You need an Instance node for each part of the feather, including the hachi. We can take variations of this feather and use the cycle command to create combinations.

Example File: Custom_Hero_Feather.ma
Download at https://www.dropbox.com/s/dwyx0896io6ihi1/Custom_Hero_Feather.ma?dl=0