Year: 2017
Client: Coop
VFX Studio: Fable FX
I was responsible for grooming and creating the look development of the donkey for the Christmas advert of Coop.
Year: 2017
Client: Coop
VFX Studio: Fable FX
I was responsible for grooming and creating the look development of the donkey for the Christmas advert of Coop.
Year: 2017
Client: Coop
VFX Studio: Fable FX
I was responsible for grooming and creating the look development of the donkey for the Christmas advert of Coop.
Gabriela Salmeron
YETI TUTORIALS
Instance
The Instance node makes it possible to replace particles or fibers with geometries or feathers in the graph. In the input 0 is connected the fibers or particles in which the objects will be instantiated. In the input 1 connect the geometries or feathers that will be instantiated.

In the case of particles, a single object will always be placed on each particle. In the case of fibers, we have two options: Points, in which each point of the thread segment will receive an instance; Elements, in which only one point will be chosen to receive a single instance.

Example File: Instance_Points.ma
https://www.dropbox.com/s/jw94gq990bjvzea/Instance_Points.ma?dl=0
The Alignment and Up Vector fields determine the orientation of the object. We can use the normal vector N or the tangent vector to orient relative to the mesh faces.
Important: There can not be a scale equal to 0. This may cause a Maya crash or an error at render time. When using attributes defined by the Groom, there is a possibility of getting zero near areas that are too small or that there are no Groom guides within the area of influence to determine a value. To ensure that this field will never be zero, we can use a clamp () function by limiting the minimum value to something greater than zero, such as 0.01 for example.
Be careful when using the Scale Variation field, so that the variation is subtracting a larger value and making the field goes to zero the scale.
Multiple Objects
You can import multiple objects with a single import node using the * (wildcard) symbol. This symbol is like a joker, in which it can be replaced by any letter, word, number or symbol. Some examples:
If you have: mesh_sphereShape, mesh_cubeShape, and mesh_planeShape
Then we can use mesh_ * Shape
If you have: mesh1_instanceShape, mesh2_instanceShape and mesh3_instanceShape
So we can use mesh * _instanceShape
If you have: mesh1_sphereShape, mesh1_cubeShape and mesh2_cubeShape
So we can use mesh * _ * Shape
Important: The main mesh in which the objects will be instantiated must have its own Import and its specified name. By default, this field comes with *, so all meshes are being imported. Always use the names with Shape at the end. Beware when using wildcard numbers at the end of the object name, Maya may get confused and put the number after the Shape, such as mesh1Shape that can be read as meshShape1.
Another way to use multiple objects is to create an Import for each object and merge them with Merge nodes before connecting it to the Instance input.
In the second tab, Objects, we choose which instances will be used and in which order. The first field, Source Objects, stipulates which method will be used to select the objects that the node received in its second input.
First: Only the first object will be used and the others will be ignored.
All: All objects are used at the same time on each wire or particle. It is useful in cases where an object is formed by several different meshes that have not been combined.
Expression: Uses the Object Expression field to define which objects will be used in each situation. We can use attributes, expressions or numbers directly. Remember that each object can be identified by a sequential number, for example, the first object will have the value 0, the second will have 1, and so on.
Cycle: Sequentially alternates each object in relation to the id of the wire or particle. It is equivalent to the expression cycle (id, 0, number of the last object).

Example File: Instance_Cycle.ma
https://www.dropbox.com/s/ct9rgyui7wle7yy/Instance_Cycle.ma?dl=0
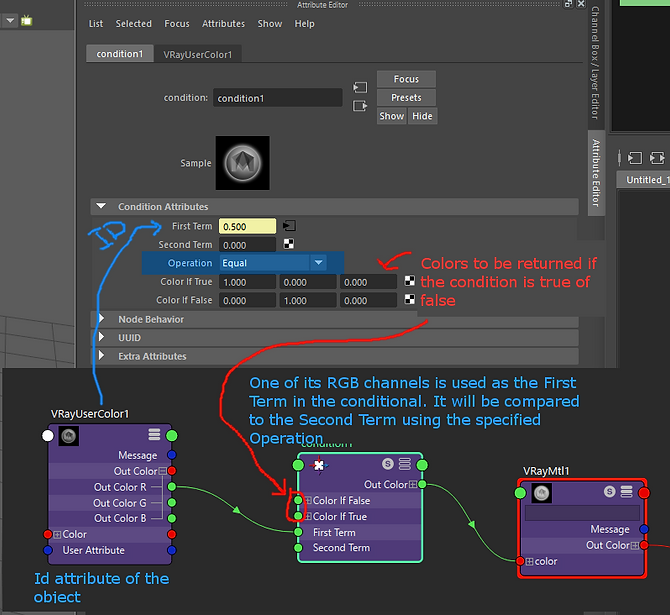
We can create an Id for each type of object and use it to map different materials to render or pass specific properties to each type of object, such as a different scale for each one. To do this, we use an Attribute node before the Instance node, since it is only possible to create new attributes on fibers or particles. We create a new attribute for the Object Id and use the same expression that will be used in the Object Expression field of the Instance node, such as the cycle () function. If you want to separate the materials in the Shader, enable the Map as Renderable Attribute option and pass the name of the attribute to the renderer in the fields below. In the shader, we can use a node of VRayUserColor (VRay) or aiUserDataColor (Arnold) to access this Id attribute and use masks to separate the shaders. A shader node useful for this separation is the Maya internal Condition node. It works similar to a conditional expression of the Yeti, and we can compare the value of the attribute with a number and return a color if it is true or another color if it is false.
Important: Each attribute created must be inherited through the Inherit Attributes field so that it can be used in the Instance node or later. Attributes can be separated with either ; as with spaces
Selecting and Positioning Objects
In the Selection tab of node Instance, you can tell exactly where objects will be instantiated relative to the fibers. In the first field, Point Selection, we can use expressions or attributes to define in which fibers or particles there are instances. The default value is 1, meaning all fibers will be receive instances.
For example, if we use the expression N [1]> 0.5, then all fibers that are in a face whose vector Normal in Y is greater than 0.5, will receive instances.

Example File: Instance_Element_Index.ma
https://www.dropbox.com/s/vpxfs8od1dmhdou/Instance_Element_Index.ma?dl=0
When we choose to instantiate objects on Elements, we have the possibility to choose at which point this element will be instantiated using the Element Point Index field, in the Selection tab. This field defaults to 0, which means that the first point of the thread (root) will receive the instance. We can put any value relative to each point or, if we want to ensure that it always stays at the tip of the wire, we use the variable vertexCount, which returns the total number of points each wire has. This field also allows attributes or expressions to be used to define this point, which can be useful for creating a range of positions. In the case of particles, it has only one point, zero.